The Hydronics Design Mode
- Home
- Documentation
- Design Modes
- The Hydronics Design Mode

Hydronics Systems
Hydronics systems heat a building by moving hot water through a series of pipes to where the heat is needed.
Hot water can be passed through above-floor hydro panel radiators, which then heat the room through radiation and convection, or through underfloor coils which will then heat the floor directly. Multiple coils are typically connected through a manifold to a boiler or similar heat source. A manifold is used to control the pressure and flow rates of the hot water.
Plandroid supports designing hydronics systems comprised of either radiator panels or underfloor coils.
Underfloor coil pipes can be laid either in-slab (that is, embedded in the concrete of the floor foundations itself), or in-screed (that is, laid on pipe positioning boards on top of the concrete foundations). In both cases a natural grid structure is normally imposed on a coil's layout by the steel reinforcement mesh in the slab or by the pipe positioning boards. Plandroid will apply a similar layout grid over a zone that will be designed to take underfloor hydronic coils.
Designing a Hydronics System
You can select the Hydronics design mode ( ) with the Design -> Loads -> Design mode drop-down button.
You should ensure that you have loaded suitable catalogs that include water pipes, manifolds, boilers, and other hydronics components when you do a design in the Hydronics design mode. There is a generic hydronics catalog that you can use if you are not using a specific manufacturer.
You can adjust the program settings to use for a hydronics designs under Options -> Design -> Design Modes -> Hydronics mode:
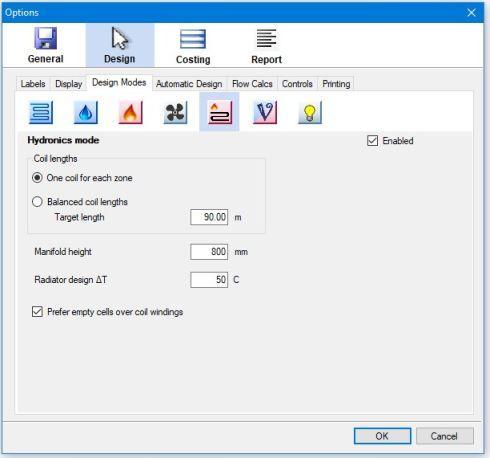 |
You can specify if you want to default to one coil for each zone you draw, or if the program should automatically add multiple coils, and if so what lengths it should aim for. The manifold height is added to the lengths of every coil. The radiator design delta T (∆T) is the temperature differential you are aiming for when designing a system with radiator panels. Radiator Parts shown in the Design -> Parts catalog and in the canvas will normally have dynamic tags in their labels, so that the radiator power shown in the catalog will be calculated according to the radiator design delta T you specify. The Prefer empty cells over coil windings checkbox controls if the program should try hard to fill all the zone with coil pipes even if that means winding the coils, or if it is better just to leave some sections without pipes and instead keep the runs as straight as possible.
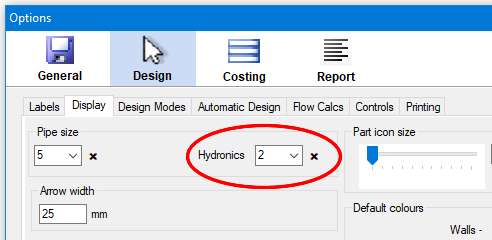
The Hydronics pipe size scaling factor that is set under Options -> Design -> Display -> Pipe size will have a large effect on how much space the pipes take up in your drawing, so it is important to choose a setting that makes your design look good. We recommend a value of 2 or 3 for best results:
 |
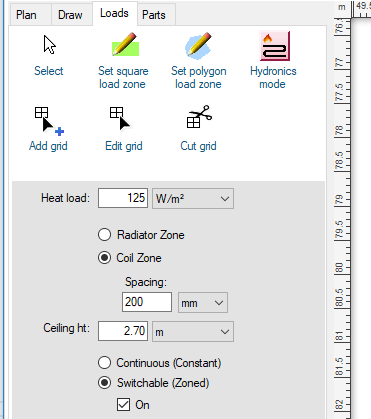
When you lay out a zone in the Hydronics design mode, the Tool Settings will let you choose between heating your zone with hydronic radiator panels (Radiator Zone) or with underfloor piping (Coil Zone), as well as specifying the coil spacing to use for that zone. If you need to have different coil spacing in a certain area, you will need to make that area a separate zone.
 |
Designing with Radiator Panels
To design a hydronics system with radiator panels, select the Radiator Zone setting. Simply add your radiator panels from the Parts catalog as required to satisfy your design criteria. In this case no coils are used in the zone.
You would normally use one zone for each room when designing with radiator panels, similar to an air conditioning design.
The radiator power output is automatically scaled from the part's rated ∆T specified in the catalog to the actual radiator design ∆T, set in the Options. ∆T is the temperature differential between the average water temperature and the desired room temperature.
Radiator panels, and other heating devices including trench heaters and towel rails, will normally require hydronic valves to connect between the device and the water supply. These are often added automatically in the catalog.
Designing with Underfloor Coils
To design with underfloor coils, you need to select the Coil Zone setting. A coil design consists of zones, coils in those zones (laid out in a grid), runner pipes from the coils to one or more manifolds, and normally boilers and supply lines between the boilers and the manifolds. A circuit consists of one or more coils plus the runner pipes that link them together and back to a manifold.
For a coil zone you would normally use one zone for all the coils being supplied from a manifold, even if that covers multiple rooms. If you are not yet sure how you will partition your design between multiple manifolds, you should start with a single zone and split it into different zones later when you can see how you will structure your design.
Whenever you draw a coil zone the program will automatically give you a starting grid and pipe layout that you can edit. You will want to edit the coil grids and the pipe layout to place the coils where you want them and to balance your design.
The coil grid is part of the load zone, and is therefore edited in the Loads tab, while the pipe coil itself is made of pipe parts that are edited in the Parts tab.
Editing Coil Grids
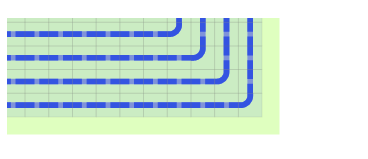
Pipe is laid out on top of an underlying coil grid, with only one pipe segment per grid cell. As a coil grid has a fixed spacing, it is normal that it may not match up exactly with the zone area itself:
 |
The coil grid is part of the zone and is edited in the Loads tab by using the Add coil, Edit coil and Cut grid tools.
 |
The Add coil tool lets you draw a new coil wherever you need one in the zone. The Edit coil tool allows you to "drag" or push an existing coil around in a zone. The Cut grid tool allows you to cut out an area that does not have any coil pipes, for example under cupboards, kitchen islands, or under walls that intrude into zones. Using the Edit coil tool beginning outside of a zone or in an existing cut area will make it behave like the Cut grid tool. Both the Add coil and Edit coil tools will show you the coil length of the coil you are editing. These tools are quite similar, and you can quickly toggle from one tool to its most closely related tool by holding down the [Ctrl] key while you are using it.
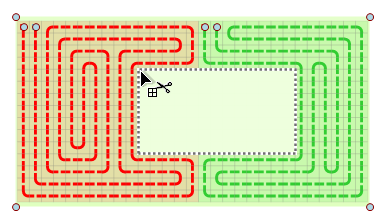 |
You can also use the context menu items Split Coil and Delete Coil if you need another way to change the number of Coils in a zone. You can have up to 20 coils in one zone.
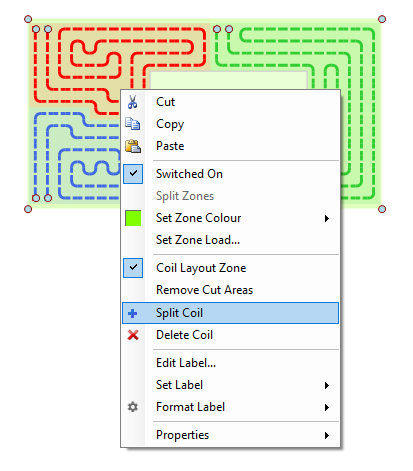 |
Using the Remove Cut Areas tool lets you actually change the zone so that any areas you have cut from the layout are actually removed from the zone. You only need to do this if it makes viewing your floor plan clearer - it doesn't change how the program functions.
Opening the Properties context menu item on a zone will also show you estimates of the total pipe length required for the zone based on the zone's uncut area and the coil spacing, and also the number of coils the zone will require, based on the zone's uncut area and the target coil length in your Hydronics Design Mode settings. These values are also shown as a tooltip on each zone in the Zones table.
You Can Align the Coil Grid
The coil grid will move with the zone if you rotate it. If you are using the Set polygon load zone tool, then the coil grid will be aligned with the first edge you draw. Use this to align the grid if that is important for your design.
Editing Pipe Layouts
Each pipe coil has an inlet and an outlet connection point. The inlet point is marked with a red (hot) square, and the outlet point is marked with a blue (cold) square. These points show where you can draw the runner pipe lines to the manifold, even though the actual pipe has no physical join at these points. You can drag these points to position the inlets and outlets to the correct positions in your design. To switch the inlet and outlet, drag one point over the top of the other. You can do this in either the Loads tab or the Parts tab.
 |
Because pipes are parts, you need to be in the Parts tab for any other editing of the coil pipes, and for adding the runner pipes.
You should add the appropriate manifolds from the Parts catalog to your design and add runner lines before you start to edit your coil layouts, because the pipe lengths naturally include these runs.
Opening the context menu on a pipe coil lets you automatically route the manifold runner pipe lines with the item Add Manifold Pipe, and to select the basic coil layout to use with the item Coil Layout.
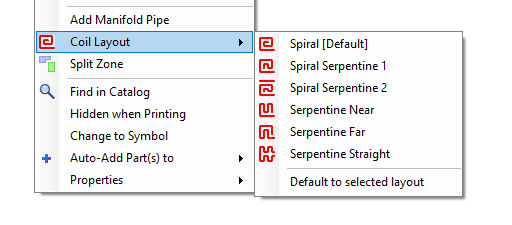 |
These create the following basic coil layout styles:
 |
 |
To manually draw in any modifications to the automatic coil layout, switch to the coil draw tool by selecting a coil and pressing the Edit coil button ( ) that appears next to the coil, or by simply double clicking on the coil. If your edits break the coil, the coil will be drawn in a dark colour. To erase a section of coil, hold down the [Shift] key while you draw. To force the drawing of a straight length of coil, hold down the [Ctrl] key while you draw.
Editing Runner Lines
The inlet and outlet points for each coil must be connected to a manifold with pipe runner lines to complete a circuit. These lines do not have to pass through any grid cells, and it is common to run them much closer together than the coil spacing distance. You would normally use the Cut grid tool to cut out the grid area to make space for the runner lines.
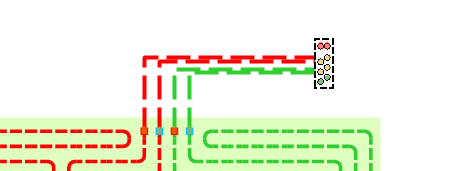 |
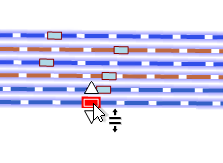
While you can draw runner lines in manually, this is somewhat tedious. It is usually better to use the Parts context menu item Connect to Manifold to lay out an initial pipe run for each selected coil and then to move them into place. You can move a single pipe segment by dragging the segment handle. If you make a selection of multiple pipe runs, you can hold [Shift] while dragging the segment handle to space the lines out evenly.
 |
Overlaying your design on top of a floor plan can often get too busy to see all the details that you need to see. Remember that you can always show only the floor plan with the P shortcut key, or hide the floor plan with the [Shift] + P key combination. If you are using one of the grid editing tools, the coil grid mesh will also be shown on the floor plan.
Balancing Your Circuit Runs
A balanced design is one where each circuit connected to the same manifold is approximately the same length. This ensures that the water flow through each circuit is also roughly the same, and therefore that each coil area is about the same temperature.
To balance your coil runs you should open the Toggle Zones Table toolbar tool ( ) which will display each coil length in each zone, as well as the status of every coil grid. The runner lines plus the manifold height are included in the coil lengths.
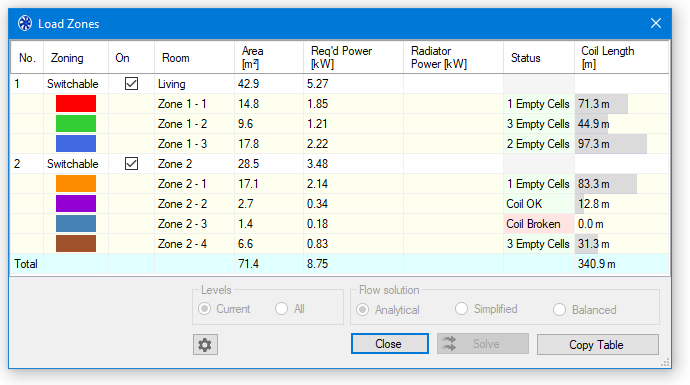 |
You can then edit the coils and pipe layouts, and immediately see the effect of every edit on the coil lengths. Zones and coils are linked between the Load Zones table and the canvas, so that whenever you make a selection in one, that zone or coil is also selected in the other. Normally you would have all the coils in one zone connected to the same manifold to make balancing them straightforward. The relative coil lengths in a zone are shown as shaded background in the Coil Length column so you can see instantly how to balance your design. Target coil lengths and number of coils are also shown as tooltips on each zone in the table.
Use the grid edit tools to move your coils areas around until you get an acceptable balance.
If you need to separate some coils into their own zone, you can go to the Parts tab, select the coils to separate, and use the context menu item Split Zone:
 |
This will create a new zone for the selected coils and remove them from the current zone.
The Check Zones toolbar tool ( ) will highlight any broken coils or empty grid cells in this design mode.
Visualising Heat Flows
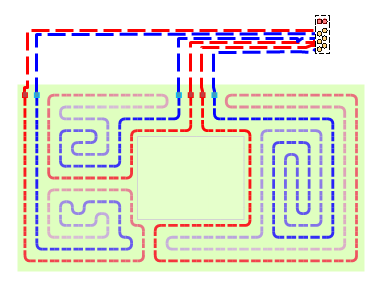
Check the heat flow with the H key or the toolbar button Show Water Temperatures ( ) to make sure the heat is getting to the right areas in your design. You may need to modify your coil designs or your inlet and outlet directions to do this. Remember you can drag an inlet or outlet point over the corresponding outlet or inlet to swap them over.
 |
Chaining Separate Coils
If you have two or more separate coils that you want to connect into the same circuit, then those coils can be chained together by connecting the (cold) outlet of one coil to the (hot) inlet of the next coil with pipe. To do this all the coils must be in the same zone - if necessary you can use the Join Zones ( ) toolbar tool to join different zones.
 |
Inserting a Coil Table into the Canvas
To insert a static coil table into your canvas, show the Zones Table, and configure which columns you want to display by right-clicking on the table header rows. Press the Copy Table button, and then paste it into the canvas by right-clicking in the design canvas, and select Paste -> Paste as Image. You can resize and reposition this image as normal. A static table does not dynamically update, so insert it when you have finished your design.
Although the coil layout is done automatically in the Hydronics design mode, the Automatic Designer tool is not applicable in this mode.